Setting up Network Printer with Raspberry Pi and CUPS
I have few laptops in my home that we (my wife, my kids, and I) use to join classes during this pandemic. Very often, we need to print something. Luckily, I bought a old Samsumg ML-2010 laser printer from an online trading platform for just $20. I had to set it in such a that we can print documents from our individual laptops running all sorts of operating systems. My laptop was running Lubuntu (a flavor of Ubuntu 18.04), my wife and son were running Windows 10, and my little princess was running a laptop with Windows 7. As we all have laptops, I decided to use my Raspberry Pi 3b+ and use the printer as a network printer. I am writing this blog as reminder to my-future-self of how I did it in the first place.
At the time of setting up the printer, I am running Raspberry Pi OS (32-bit) Lite as headless. First of all, I updated my rpi OS using this command:
sudo apt updateThen, I installed the CUPS using the following command:
sudo apt install cupsThen I added rpi user admin privileges, so that we can login and modify the setting on CUPS. We can run the following command to this:
sudo usermod -a -G lpadmin ${USER}Then we need to allow remote connections to our CUPS remote server with this command:
sudo cupsctl --remote-anyAt this point, we need to restart our CUPS server:
sudo /etc/init.d/cups restartThen I checked the IP address of my rpi by using the following linux command:
ifconfigDepending on the type of network (ethernet or wifi), you will need to find the inet of the host, which is the IP address of the rpi. By default, CUPS setup a printer server on that IP address but on port number 631. At this point, you should be able to open a browser tab and navigate to the CUPS server by typing in the IP address of you rpi followed by :631 . So, the address would look something like this:
192.168.0.20:631You should get a screen that look like this:
Now, click on Administration from the navbar and click Add Printer button under Printers section. At this point, you may get the following page, which is basically a warning about accessing the page in https mode:

You can just click the link to navigate to the https page. Click on Add Printer again. Now, you should see a new page to Add Printer and you should see your printer listed on the page like this:
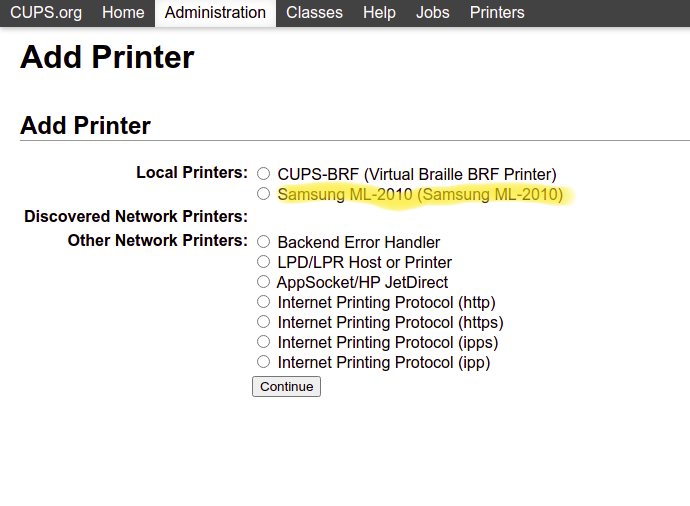
Click Continue and you will get the next page to enter the details of the printer that may look like following (you can enter a suitable name for the printer, which we will be using to add in our client devices):
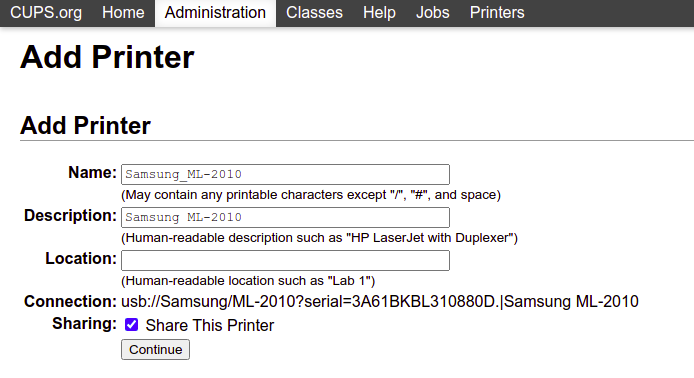
As I am sharing this printer accross network, I have checked the box Share This Printer and click continue. At this point you should be presented with a list of makers of printers. If your printer is not in the list, there are two ways you can add the printer: install drivers for the maker (Samsung in my case) or add PPD file that is specific to your printer.
To install drivers for Samsung printers, I used the following command:
sudo apt install printer-driver-splixFor HP printers you can use:
sudo apt install hplipFor individual PPD files, check out this webpage or this github page. Select file/specific printer and click Add Printer.
Now you have finished setting up your print server and need to add you printer to the client computers.
Adding Printer on Windows 10
To add the printer on a computer running Windows 10, go to Windows menu and start to type printer and select Printers & Scanners. A new dialogue box will appear where you need to select Add a printer or scanner . When the text The printer that I want isn't listed appears, click on that. Then select Select a shared printer by name and type the address of the printer like this and click Next:
https:://192.168.0.20:631/printers/Samsung_ML-2010Remember, the IP address of this address will be the IP address of you raspberry pi and your printer name should replace Samsung_ML-2010. A new dialogue box would appear called Add Printer Wizard. Select the Manufacturer of the printer and Printers. If you printer doesn’t appear on the list, you can click Windows Update to update the list of the list of drivers Windows has installed. Finally, click Ok and exit out of the wizard.
I hope this would help you to setup your network printer. Please feel free to leave your feedback in the comments!
